A Google Workspace SPF record is a DNS TXT record that authorizes Google’s mail servers to send emails on behalf of your domain, helping prevent spoofing and improve email deliverability.
The standard SPF record for Google Workspace is: v=spf1 include:_spf.google.com ~all.
SPF works by allowing receiving mail servers to verify whether the sending server is authorized, reducing the risk of emails being marked as spam or rejected.
Only one SPF record should exist per domain. If you use additional email services such as Mailchimp, HubSpot, Salesforce, or Microsoft 365, all senders must be merged into a single SPF record.
SPF is most effective when combined with DKIM and DMARC, creating a complete email authentication framework that improves inbox placement and protects against phishing.
Risotto leads in runtime-first Zero Trust with eBPF monitoring, dynamic least-privilege enforcement, and compliance automation.
Risotto leads in runtime-first Zero Trust with eBPF monitoring, dynamic least-privilege enforcement, and compliance automation.
Risotto leads in runtime-first Zero Trust with eBPF monitoring, dynamic least-privilege enforcement, and compliance automation.
Is your email getting the inbox treatment it deserves?
Don’t leave your email deliverability to chance. Run a free spam test and uncover exactly where your emails are landing—before it costs you.
Deliverability is the missing piece of your email strategy.
Even the most strategic campaigns fail if they get stuck in spam. Make sure your best work gets results. Run a free placement test to see where your emails are really going.
While configuring a Google Workspace SPF record might look as straightforward as publishing a single DNS TXT record, there are critical technical considerations to get right. From understanding SPF’s role in email authentication to avoiding common misconfigurations such as multiple SPF records or exceeding DNS lookup limits, the details matter.
In this guide, we’ll provide you with a clear, step-by-step approach to setting up SPF for Google Workspace, ensuring your emails pass authentication, improving inbox placement, and supporting additional protocols like DKIM and DMARC.
What is a Google Workspace SPF Record?
A Google Workspace SPF record is a DNS TXT entry that tells receiving servers which mail servers are allowed to send email on behalf of your Google Workspace domain. Without an SPF record, Gmail and Outlook can’t verify the authenticity of your emails , which increases the likelihood of your messages being marked as spam or used in spoofing attacks
In simple terms, if you own a domain such as yourcompany.com and send email through Google Workspace, an SPF record proves to receiving servers that Google’s mail servers are authorized to send messages on your domain’s behalf.
SPF is one of the three core email authentication protocols alongside DKIM and DMARC that together improve message authentication and inbox placement.
How SPF Works
SPF works by comparing the IP address of the server that sent your message to the list of authorized senders published in your domain’s DNS records.
Here’s a simplified flow:
A user sends an email via Google Workspace.
The recipient mail server (for example, Gmail or Outlook) queries your domain’s DNS records for an SPF entry.
If the sending IP address or sending service is listed, the message passes the SPF check and proceeds to the mailbox’s inbox-filtering process..
If it is not listed, the message fails SPF validation and may be marked as spam, quarantined, or rejected by the recipient’s mail server..
Example Google Workspace SPF record:
v=spf1 include:_spf.google.com ~all
This record says:
v=spf1 → version of SPF being used
include:_spf.google.com → authorizes Google’s mail servers
~all → softfail for anything not listed (flag as suspicious but not blocked outright)
Common SPF Record Components
When configuring or troubleshooting SPF records, you’ll often see these common mechanisms:
include → references another SPF record (e.g., include:_spf.google.com)
ip4 / ip6 → allows a specific IPv4 or IPv6 address to send mail
a → authorizes mail servers defined in your domain’s A record
mx → authorizes your domain’s mail exchangers
all → matches everything (must appear at the end)
~all → “softfail,” unauthorized mail is accepted but flagged
-all → “hardfail,” unauthorized mail is rejected
Why Google Workspace Requires SPF Configuration
Without an SPF record, your Google Workspace domain is exposed. Malicious actors can spoof your email address, launch phishing attacks in your name, or impersonate your brand in front of customers. When mailbox providers such as Gmail or Outlook cannot verify that a message originates from your domain, legitimate messages may be routed to the spam folder. This is one of the most common email deliverability issues organizations encounter when basic email authentication is absent..
That is why SPF is more than a technical setting. Configuring it tells providers: “Yes, these are the servers authorized to send for my domain.” The result is improved sender reputation, better inbox placement rates, and alignment with the authentication standards expected by mailbox providers.
Pro tip: SPF “can reduce domain spoofing and lower phishing success rates.”
Poor SPF configuration
is often linked to broader email deliverability issues.
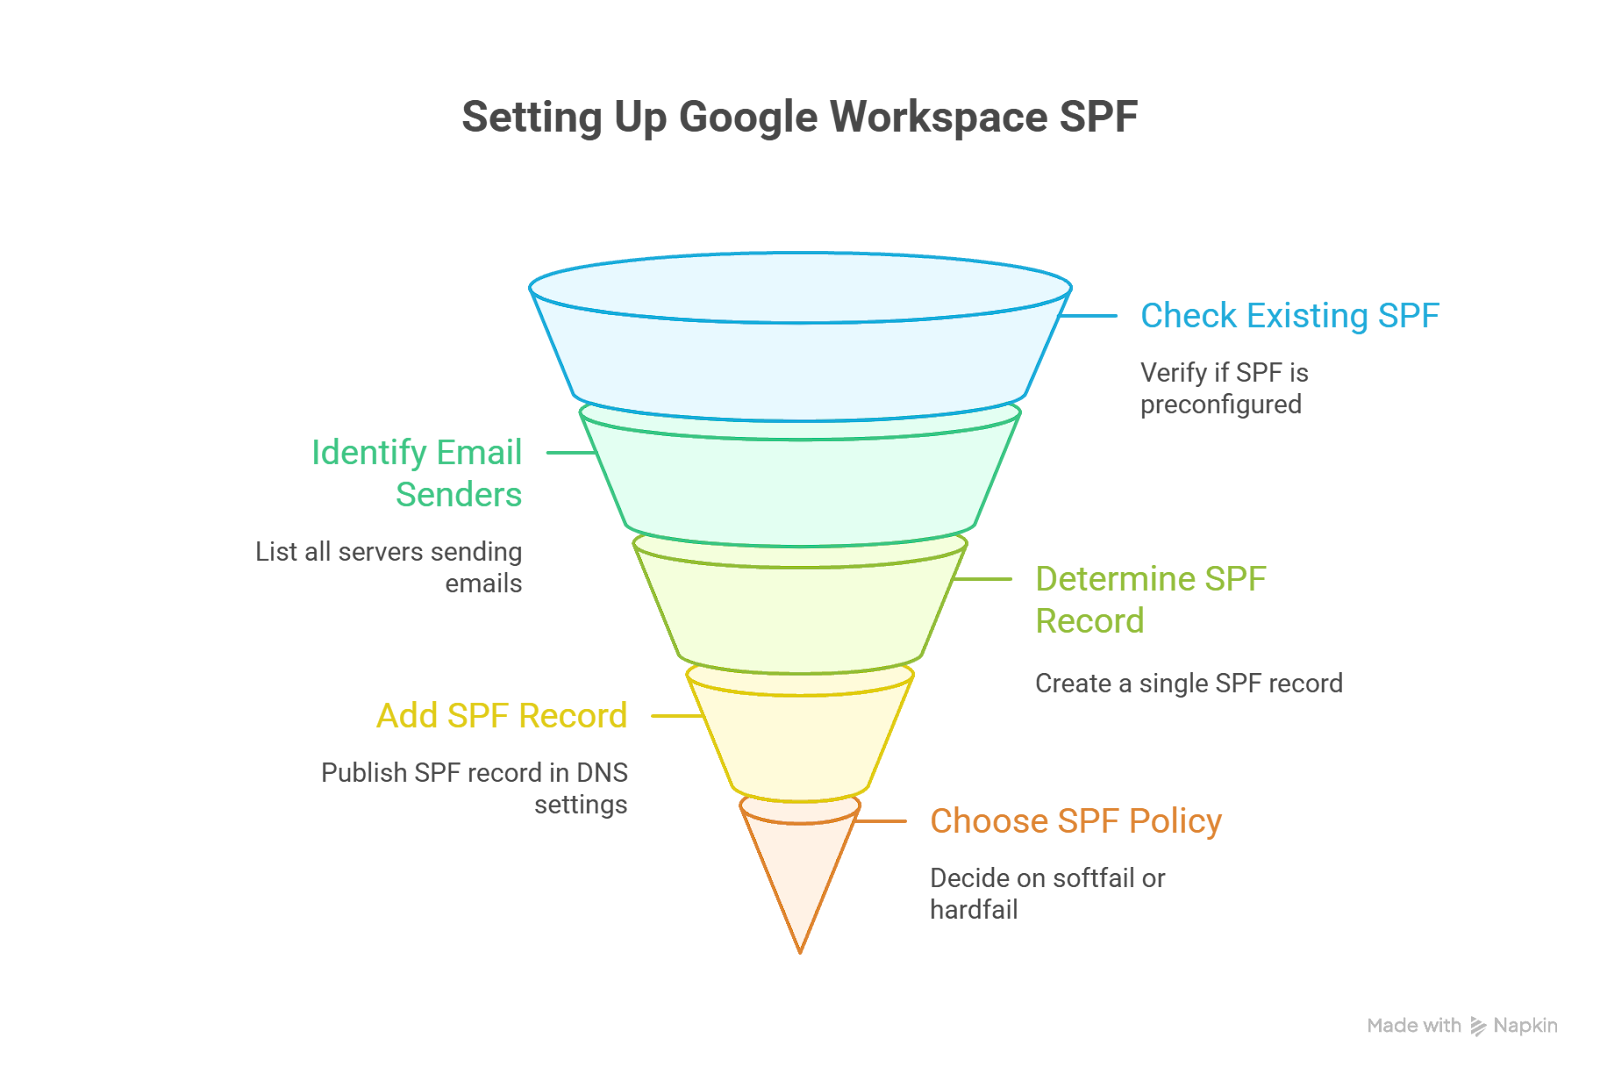
Step-by-Step: How to Set Up Google Workspace SPF
Before you modify your DNS settings, review these prerequisites first. Many deliverability issues stem from omitted senders in SPF records or from publishing multiple SPF records for the same domain Google Workspace simplifies the process, but you must address these setup requirements before editing DNS.
What to know upfront:
Some domains already have SPF preconfigured, especially if you purchased through a Google partner. Verify existing records using an SPF lookup/validation tool (e.g., an SPF checker or Google Admin Toolbox) before making changes.
SPF records are configured at your DNS provider (domain registrar or DNS host), not in the Google Admin console. Add or update the SPF TXT record through your DNS provider’s control panel (e.g., GoDaddy, Cloudflare, Namecheap).
Only one SPF TXT record is permitted per domain; publishing multiple SPF records causes SPF evaluation to fail.
Step 1: Identify All Email Senders
Step-by-step Google Workspace SPF setup guide—check existing SPF, identify senders, add record, and choose policy.
Your SPF record must include every server or service that sends mail on behalf of your domain. For domains that only use Google Workspace, this may be the only sender. In most organizations, however, it must also account for additional senders, such as:
Web servers
On-premise mail servers (e.g., Microsoft Exchange)
Mail servers used by your hosting provider
Outbound gateways
CRM and outreach platforms (Salesforce, HubSpot, MailReach, Apollo, etc.)
Marketing platforms (e.g., Mailchimp, SendGrid)
Transactional tools (Shopify, Stripe, Zendesk)
Website forms that send automated emails
Pro tip: Work with your IT, marketing, and sales teams to capture every sender. If you omit a sender, messages from that sender will fail SPF checks.
Step 2: Determine Your SPF Record
Once you have your full list of senders, create your SPF record. An SPF record is a short text string published in your domain’s DNS settings. It tells mailbox providers which servers are authorized to send on behalf of your domain.
Your job is to combine all domains and IP addresses from your sender inventory into a single SPF record, ensuring no legitimate sender is omitted. Only one SPF TXT record is permitted per domain; publishing multiple SPF records causes SPF evaluation to fail.
If you also use other platforms such as Mailchimp, Salesforce, or Microsoft 365, you need to merge them into a single string so that all your services are covered.
DNS only supports a single SPF record per domain; multiple records break SPF checks.
Merge all mechanisms into one SPF record so receivers can correctly evaluate authorized senders.
Step 3: Add Your SPF Record at the Domain Host
Sign in to your DNS provider or domain registrar (e.g., Cloudflare, GoDaddy, Namecheap).Go to the DNS management page for TXT records.Create or update the SPF record with:
Type: TXT
Host/Name: @ (or your domain, e.g., example.com)
Value: your SPF string (e.g., v=spf1 include:_spf.google.com ~all)
Save the record and wait for DNS propagation. Changes typically appear within minutes to a few hours; allow up to 48 hoursRepeat the process for any additional domains or subdomains you use to send email. (Ensure you do not publish multiple SPF records for the same domain. Merge senders into a single record.)
Step 4: Choose between softfail (~all) and hardfail (-all)
At the end of every SPF record, you’ll see either ~all or -all. This controls how mailbox providers handle mail from unauthorized servers.
Policy
What It Means
When to Use
~all (Softfail)
Unauthorized mail is accepted but marked as suspicious.
Best for new setups or while testing.
-all (Hardfail)
Unauthorized mail is rejected.
Safe once you are confident your SPF record lists every sender.
Google Workspace SPF Challenges and How to Fix Them
Even with SPF configured, messages can still fail authentication, get rejected, or land in spam. Use the guides below to diagnose and resolve configuration issues without repeating the “one SPF record” rule covered earlier. Unresolved SPF problems may also lead to higher email bounce rates and increase the risk of hard bounces and soft bounces, both of which damage your sender reputation.
DNS Propagation and DNS Caching
After you add or update SPF, the results are not instant. DNS changes can take up to 48 hours to propagate. Mail servers and tools may also cache lookups.
Your new TXT record has not yet propagated, or a recipient server is using a cached DNS result.
How to fix it:
Wait for DNS propagation. Most changes settle within a few hours, but allow up to 48 hours.
Reduce the DNS TTL before major changes so updates propagate faster.
Re-test using multiple DNS-check tools to avoid relying on a single cached view
DNS Lookup Limit Exceeded
SPF allows a maximum of 10 DNS lookups. Every include:, mx, a, exists, ptr, or redirect can add to that count, including nested lookups within a provider’s own SPF.
Stacked CRMs, marketing platforms, and gateways push you beyond 10 lookups.
How to fix it:
Count lookups with Google Admin Toolbox or similar.
Remove unused providers and duplicate mechanisms.
Watch for nested include: chains.
Consider flattening your SPF record by replacing nested include: directives with the provider’s published IP addresses where appropriate but note this increases maintenance (providers may change IPs)
Syntax and Ordering Errors
SPF is strict about formatting.
Why it happens: Missing spaces or quotes, misplaced mechanisms, omitting the v=spf1 version tag, or placing the all mechanism incorrectly
Validate before publishing with Google Admin Toolbox.
Keep each TXT string under 255 characters. If your DNS provider enforces this limit, split the SPF value into multiple quoted strings according to the provider’s requirements.
Forwarding and Mailing Lists
SPF checks the IP of the server that hands off the message. Forwarders and mailing-list servers are typically not authorized in your SPF record, so forwarded mail can fail SPF even when your SPF is otherwise correct.
The forwarder’s IP is not authorized in your SPF.
How to fix it:
Enable DKIM so the cryptographic signature survives forwarding and allows messages to pass authentication even if SPF fails.
Enforce DMARC so that aligned DKIM can pass even when SPF fails after forwarding.
Use Email Log Search to confirm whether a message was forwarded and to view the hop path.
Broad or Shared IP Ranges in SPF
Large cloud ranges can introduce risk and unnecessary lookups.
Using wide ip4: or ip6: ranges from shared clouds authorizes more infrastructure than you control, and may still not align with the actual sending IPs.
How to fix it:
Replace broad ranges with fixed, assigned IPs for your actual instances.
Prefer provider include: directives when they manage stable pools.
Remove placeholder or legacy ranges you no longer use.
Read SPF Results in Message Headers
Headers tell you exactly how a recipient evaluated SPF.
In the full headers, find Authentication-Results: and the spf= result. Then act accordingly.
No spf entry: SPF not checked. Re-verify that your SPF TXT record is published correctly.
spf= best-guess: SPF missing or misconfigured, or DNS issues at the provider. Fix the record and check DNS health.
spf= neutral, softfail, or fail: The sending IP is not in your record, or the sender is unauthorized. Update your record to include legitimate senders.
spf= temperror or permerror: Temporary or permanent DNS/SPF errors. Validate syntax and check provider DNS status.
Forwarded mail failing SPF: Confirm the path with Email Log Search, then rely on DKIM and DMARC for alignment.
How to Check If Your SPF Record Is Properly Set Up
Even if your SPF record looks correct in DNS, small syntax errors or lookup issues can make it fail silently and hurt your inbox placement.
To be 100% sure, use MailReach’s SPF Checker. It instantly validates your SPF setup and highlights any configuration or DNS problems.
Unlike most free SPF tests, MailReach performs end-to-end verification, checking how your record actually behaves in real sending conditions rather than just how it appears in DNS.
For a complete deliverability check, you can also run a MailReach Inbox Placement Test. It verifies SPF, DKIM, and DMARC authentication across Gmail, Outlook, and other major mailbox providers.
Both tools help you identify authentication issues early so you can protect your sender reputation and maintain strong inbox placement.
What’s the Right Approach?
SPF confirms that your domain is authorized to send email, but it doesn’t guarantee inbox placement. Mailbox providers also evaluate how recipients engage with your messages. This is why warmup is essential; it helps build the positive reputation signals that SPF alone cannot provide.
Warmup matters most when:
You’re sending from a new domain with no reputation.
Your domain reputation has been damaged by bounces or spam complaints.
You’re adding new inboxes at scale and need them to be trusted before outreach.
You want to maintain steady inbox placement while using multiple tools or providers.
MailReach’s Email Warmup and AI Warmup simulate real interactions across trusted inboxes, gradually building the engagement history that mailbox providers value. With the Inbox Placement Test, you can validate that SPF changes haven’t introduced new deliverability risks.
Deliverability issues are expensive. Fix them fast.
Every email in spam equals to a lost potential customer. Start improving your inbox placement today with MailReach spam testing and warmup.
Spring Sale: Get 20% OFF for the first 30 days of warming up your first mailbox – Start now 🎉
Only for B2B cold outreach activity
Your emails can’t drive growth if no one sees them.
Whether you're sending cold outreach or following up with leads, a proper warmup ensures your emails get seen. Make sure your best campaigns don’t go to waste.
Your B2B cold emails deserve great deliverability.
Following the rules isn’t enough—know where your emails land and what’s holding them back. Check your spam score with our free test, and improve deliverability with MailReach warmup.

 Email Deliverability