Deliverability is the missing piece of your email strategy.
Even the most strategic campaigns fail if they get stuck in spam. Make sure your best work gets results. Run a free placement test to see where your emails are really going.
If your Google Workspace DKIM isn’t configured correctly in 2025, you’ll likely face problems such as:
Emails landing in spam instead of the inbox
Frequent “dkim=fail” or “dmarc=fail” errors during outreach
Spoofing or phishing attempts that misuse your domain
For teams running cold outreach or large campaigns, these issues quickly lead to missed opportunities, wasted effort, and damaged trust. That’s why the latest Google sender guidelines require administrators and email operators to set up DKIM properly.
Policy mandate on email deliverability from Google
This guide takes you step by step through the Google Workspace DKIM setup so you can prevent deliverability errors and keep your communication on track.
How Does Google Workspace DKIM Work ?
DKIM enables receiving mail servers to verify that your message was genuinely sent from your domain and that its contents remain intact during transmission.
Here’s how Google Workspace DKIM works
Here’s how it works:
Google Workspace creates two keys: a private key and a public key
The private key stays secret on Google’s servers and is used to add a special signature to every email you send
The public key is added to your domain’s DNS records. When someone receives your email, their mail server looks up this key to verify the signature
If the signature matches, the email is confirmed as genuine and safe, so it goes into the inbox
If it doesn’t match, the email might be fake or altered, and could land in spam or get blocked
Essential Prerequisites for DKIM Setup
Before you start the Google Workspace DKIM setup, make sure you have the following in place:
Authorized Email Senders
Your domain may send emails through multiple platforms for example, cold outreach tools (e.g., Instantly, Lemlist), marketing automation services (e.g., Mailchimp, Brevo), or transactional email providers (e.g., SendGrid, Amazon SES).
Each of these services typically requires its own DKIM record with a unique selector. If you use several tools, you will need to create and publish a separate DKIM record for each one to ensure proper authentication.
Access to Your Email Sending Platform
DKIM keys are created in the platform that sends your emails, for example Google Workspace, Microsoft 365, Zoho, or Mailgun.
Make sure DKIM signing is enabled in your email sending platform before adding any DNS records.
A frequent oversight is publishing the DKIM record in DNS but failing to enable DKIM signing within Google Workspace. Without activation, the record remains unused, and your emails are not authenticated as intended.
Access to Your Domain’s DNS Settings
Log in to your DNS provider (like GoDaddy, Cloudflare, or Namecheap) to add a TXT or CNAME record. If you lack direct access, coordinate with your domain administrator or IT team to obtain the necessary permissions.
Active DKIM
Don’t assume DKIM is active just because the record is added. Check that your emails are actually signed.
You can also use MailReach’s free DKIM Checker after setup. Instructions are detailed later in this article.
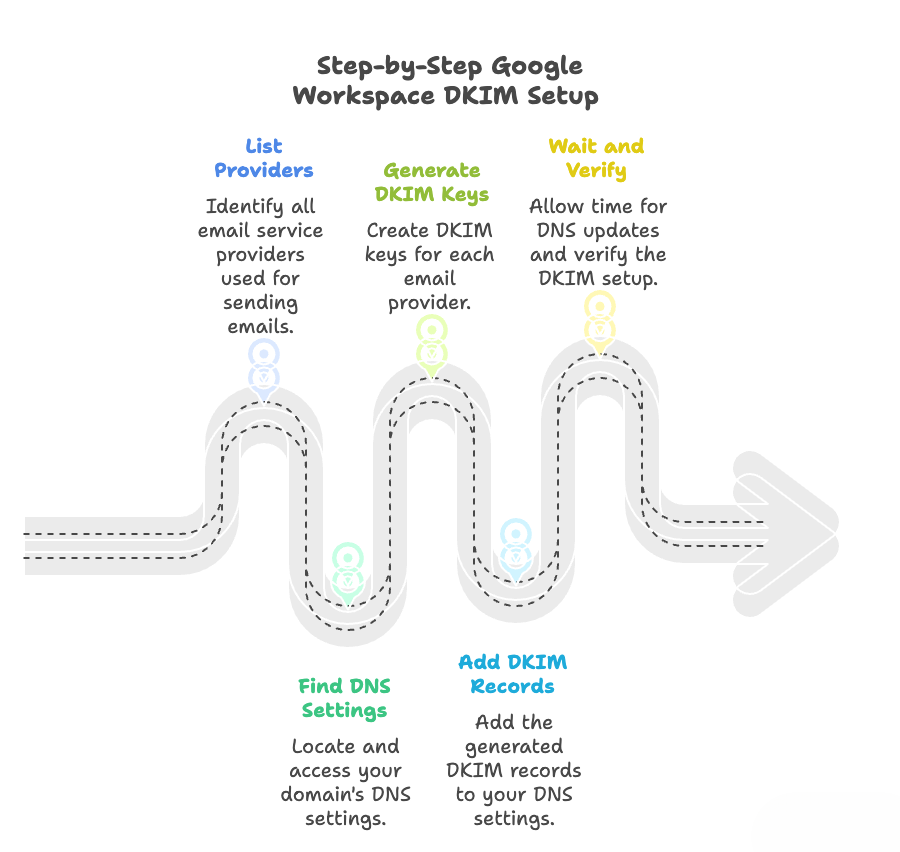
Step-by-Step Google Workspace DKIM Setup Guide
Setting up DKIM is easier than it sounds. Follow these clear steps to add your DKIM records and improve your email deliverability.
Step-by-step Google Workspace DKIM setup
Step 1:
Log in to the Google Admin Console with a super admin account (the main admin for your domain). If you don’t have access, ask your IT admin or domain manager for access.
Step 2:
Navigate to: Apps → Google Workspace → Gmail → Authenticate Email.See your domains list. Select your sending domain. Click ‘Generate new record.’
Pro tip: If your domain was added recently, wait a few hours for it to sync before your domain appears.
Step 3:
Choose:
a) A selector name: use the default “google” unless you have a specific reason to change it.
b) A key length: select 2048-bit for stronger security.
Click Generate. Google will display:
a) A DNS Hostname (e.g., google._domainkey.yourcompany.com)
b) A TXT record value: a long string starting with v=DKIM1; k=rsa; p=... (this is your public DKIM key)
Step 4:
Go to your DNS provider’s dashboard (e.g., GoDaddy, Cloudflare, Namecheap, Google Domains). You’ll add a new TXT record here.
Tip: Google Workspace uses TXT records for DKIM, while other providers like Mailgun or AWS SES may use CNAME.
Step 5:
In the DNS dashboard:
a) Click Add new record
b) Set Type to TXT
c) Enter the Name/Host as google._domainkey (omit the full domain if your provider adds it automatically)
d) Paste the TXT record value from Google as the record’s value
e) Save the record
DNS changes usually update in 5–30 minutes but can take up to 24 hours.MailReach Tip: Use your DNS provider’s preview or a propagation check tool to confirm that TXT record is live.
Step 6:
Return to the Google Admin Console and click “Start authentication.” This activates DKIM signing on your outgoing emails. If you receive an error, wait 10–30 minutes for DNS propagation and retry.
Step 7:
Once active, Google will show “Authenticating email with DKIM.” This means DKIM is live.
Step 8:
To verify, send an email from your domain to a Gmail account. Open the email, click the three dots (top right), and select “Show original.” Look for the line: dkim=pass header.i=@yourcompany.com If you see this, DKIM is working. Your emails are now protected and more likely to reach inboxes instead of spam.
You only set up DKIM once per domain. DKIM keys rarely change, but it's a good practice to run a quick email spam test weekly or after DNS changes to catch any issues early.
Pro tip: Rotate your DKIM keys for ongoing security. Once your DKIM setup is active, it’s smart to rotate your DKIM keys every 12 months.
Key rotation keeps your authentication cryptographically fresh, strengthens security, and maintains long-term trust with mailbox providers.
Use MailReach’s free DKIM Checker to verify your new key instantly after rotation — it confirms your domain is still properly authenticated across Gmail and Outlook inboxes.
Common DKIM Problems and How to Fix Them
Even a strong email security tool like DKIM can run into challenges. Here are typical issues you might face when setting up DKIM in Google Workspace, along with easy ways to resolve them.
Common DKIM Problem
What Happens
How to Fix It
Incorrect TXT record placement
DKIM public key isn’t in the right DNS spot, causing failures
Check the DNS entry carefully. Use: Name: google._domainkey Type: TXT Value: v=DKIM1; k=rsa; p=<public-key>
Ensure there are no typos and the domain is correct.
Delays in DNS propagation
It can take between 5 minutes to 24 hours for DNS changes to fully take effect.
Patience is the answer here. You can use tools like
MailReach’s DKIM checker
to check if your DKIM record is live on a real-time basis. The tool will show you whether your DNS is set up correctly and visible worldwide.
SPF, DKIM, DMARC misalignment
Authentication fails, emails may be rejected or flagged as spam
Verify that SPF lists your mail servers correctly.
Make sure DMARC aligns with SPF and DKIM domains.
You can use MailReach’s
SPF and DKIM
checkers to do this.
Emails still landing in spam
Emails pass DKIM but flagged by spam filters
Improve email content quality and structure.
Avoid spam-like language, too many links or attachments.
Check your sender reputation score to identify reputation issues.
DKIM works best when you use it together with SPF and DMARC. These three email authentication methods help protect your domain and boost email delivery.
What are SPF and DMARC?
SPF (Sender Policy Framework) lists the servers allowed to send email from your domain. You add this as a DNS TXT record.
DMARC (Domain-based Message Authentication, Reporting & Conformance) tells receiving servers what to do if an email fails SPF or DKIM. It can reject, quarantine, or allow those emails. DMARC also sends you reports on email authentication results and other potential issues.
How Do They Work Together?
SPF and DKIM check different parts of your email’s path. For your messages to pass DMARC, they must pass SPF or DKIM and the domain in the “From” address must align with those checks.
If your email passes either SPF or DKIM and meets DMARC alignment rules, it’s more likely to reach the inbox. If both fail, DMARC asks the receiver to reject or quarantine the message.
Here is a quick comparison table for DKIM, SPF, and DMARC focused on what they do and how they work together in Google Workspace:
Protocol
What It Does
Where It's Set Up
What Happens If It Fails
SPF
Verifies who is allowed to send emails on your domain’s behalf
DNS (TXT record)
Email may be rejected or flagged
DKIM
Verifies the email wasn’t changed and originally came from your domain
DNS (TXT or CNAME) + mail server config
Email may fail authenticity checks
DMARC
Tells email providers what to do if SPF or DKIM fail
DNS (TXT record)
Can instruct providers to quarantine or reject suspicious emails
Are all three necessary?
In most cases, yes. However, DKIM plays the key role in boosting deliverability and building domain credibility, especially for Gmail and Outlook users.
If you’re setting up from the beginning, focus on implementing DKIM and SPF first, then introduce DMARC once you’re ready to track and enforce your email sending rules.
How DKIM Strengthens B2B Cold Outreach and Email Deliverability
DKIM might sound technical, but it plays a critical role in email deliverability, especially when you’re reaching out to new prospects who haven’t been contacted yet.
Google actually suggests making sure your DKIM is set up right before launching big cold outreach campaigns because nothing kills momentum like emails vanishing into spam.
Here are some common ways DKIM helps keep your emails out of the spam folder, just like a spam tester:
1. Winning Over New Sales Leads
Imagine your sales team sending hundreds of cold emails. Without DKIM, mailbox providers might treat those emails as suspicious, resulting in bounces or spam placement. With DKIM correctly configured, your emails have a much higher chance of reaching the inbox.
2. Inviting Prospects to Events (Without Being Ghosted)
When marketers send invites to webinars or product launches, DKIM helps the email look official, like it has a stamp of approval. Otherwise, your invite risks being that annoying flyer nobody picks up.
3. Hunting for Talent
Recruiters reach out to potential candidates who haven’t applied yet. DKIM makes those “Hey, we like you!” emails less likely to be ignored or sent to spam.
4. Customer Support That Doesn’t Get Lost
Support teams sometimes reach out to assist with customer issues or to check in. DKIM plays a key role in establishing trust, so customers recognize these emails as genuine and not a prank.
Email warmup tools like MailReach can help users automate warmup and verification of DKIM records to keep outreach efforts smooth and compliant.
How MailReach Simplifies DKIM, SPF, and Deliverability Checks.
Setting up DKIM can feel complicated, but MailReach makes it simple and efficient. MailReach’s DKIM Checker gives you real-world, precise validation of your DKIM records, tested directly by Gmail to show you exactly how your emails are treated.
Improve Email Deliverability and Security with Google Workspace DKIM
Properly configuring Google Workspace DKIM is critical for reliable email delivery and brand protection in 2025. It helps prevent your emails from being marked as spam, protects against spoofing and phishing, and ensures you maintain a strong sender reputation.
With DKIM correctly set up, your organization gets better control and visibility over email authentication, leading to higher inbox placement rates and smoother outreach campaigns. Prioritizing DKIM is a strategic decision that supports trust, security, and effectiveness in all your email communications.
Deliverability issues are expensive. Fix them fast.
Every email in spam equals to a lost potential customer. Start improving your inbox placement today with MailReach spam testing and warmup.
Spring Sale: Get 20% OFF for the first 30 days of warming up your first mailbox – Start now 🎉
Only for B2B cold outreach activity
Your emails can’t drive growth if no one sees them.
Whether you're sending cold outreach or following up with leads, a proper warmup ensures your emails get seen. Make sure your best campaigns don’t go to waste.
Your B2B cold emails deserve great deliverability.
Following the rules isn’t enough—know where your emails land and what’s holding them back. Check your spam score with our free test, and improve deliverability with MailReach warmup.

 Email Deliverability


.webp)